Monday, October 27, 2014

Milk Paint Dresser Reveal & Before Pictures of the New House!


Hi friends! Im excited to share with you the finished project of a dresser I started awhile ago...


A few weeks ago I shared it with you here and it looked like this...


It was still a work "in progress" at this point. I was having a little trouble with this spot in the front...

Here's the spot now...


You can still see it but it's much less obvious now! I just sanded it down a bit and kept applying light coats of Miss Mustard Seed Linen (the color on the drawers). I probably did about 5 light coats on the spot.

I decided to change the paint color on the body of the dresser. I used a mixture of Miss Mustard Seed Milk Paint Shutter Gray and Eulalie's Sky. It's a beautiful gray-blue color and some of the blue-green color I used last time still shows through a bit where it's distressed.


I'm in love with the how the top turned out so I didn't change that! But I did give it a nice coat of Miss Mustard Seed Hemp oil to shine and protect it!


We've been hard at work at our new house! I didn't get very good before pictures, we just jumped in to renovations but here are a few...


There's my hubby photo bombing in the last photo! Haha!

Linked up to:http://missmustardseed.com/, http://elizabethandco.blogspot.com/, http://www.lizmarieblog.com, http://www.stonegableblog.com, http://cityfarmhouse.com/, http://www.thegoldensycamore.com,http://www.findingsilverpennies.com/, http://www.thegirlcreative.com/


Wednesday, October 15, 2014

Frozen Inspired Cabinet Part II and My Tour Through Blog Land

Hi friends! It seems like forever since we've last "talked"! We got home a few days ago from our trip out East! I was hoping to have some lovely pictures to share with you of the fall foliage. But the day we got to New York my phone fell in the toilet! It was actually kind of nice to be "unplugged" from technology for a whole 10 days or so! I'm thinking I need to do it more often, maybe next time I'll leave my phone at home though (paying the replacement fee for a new phone is not fun!)
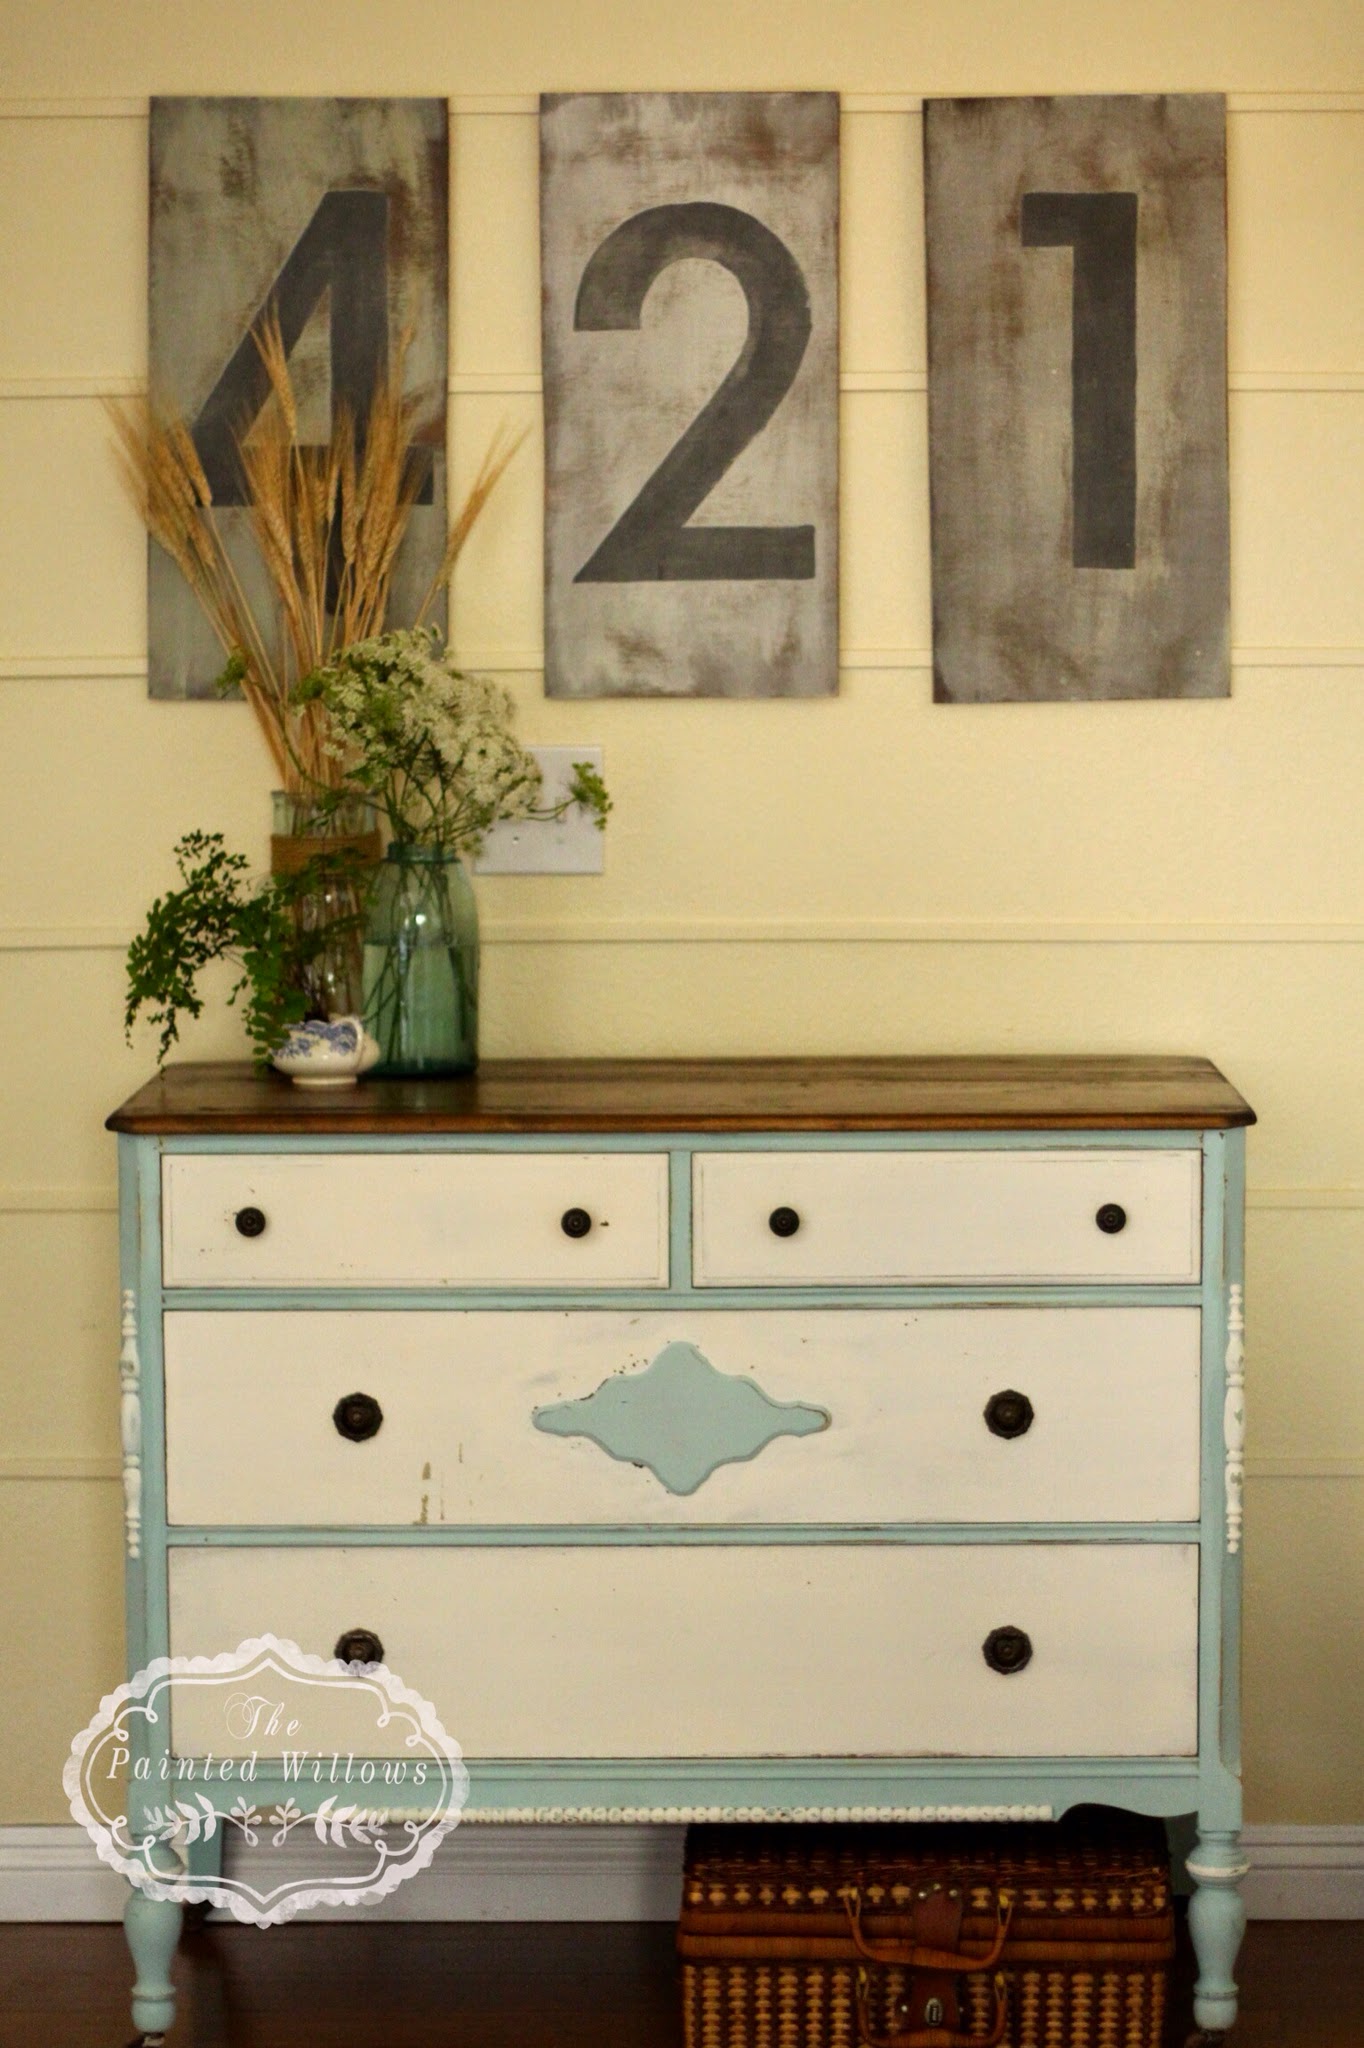
I wanted to share the finished product with you of my Frozen Inspired Cabinet. I decided to paint the hutch that came with it...

 
I wasn't sure I was going to paint the hutch. But I'm so glad I did! I painted the hutch portion in Miss Mustard Seed Milk Paint the Linen color. I love the chippyness that happened! The cabinet is also painted with Miss Mustard Seed Milk Paint you can read more about the colors I used here!
The hutch isn't attached. Which I actually like. You can choose weather or not to use it. It's still quite sturdy just sitting on the cabinet!


I also wanted to share my "Blogland Tour" with you today!

My sweet blogging friend Sharon, from Elizabeth & Co. recently invited me to be part of the Blog land Tour! Sharon is so talented and she has a link party every Tuesday that is a great place to share projects you are working on or be inspired by others!

Here is some of her amazing work! I'm in love with this black table she posted about here!


Check out these awesome DIY picture ledges and here tutorial here!


And this gorgeous"Lamp Black Mid-Century Modern Dresser!"


The Blog Land Tour is a series of questions that one blogger asks another about their blog. Its a way to learn about new blogs and get to know the person behind the blog! I'm so excited to share a bit more of myself with you!

So here's my list of questions!

How does my work differ from others of its genre?
There are so many amazing blogs out there that share furniture makeovers and tutorials! I love so many of them! I could spend hours each day reading and enjoying them! Every blog has a unique style and feel. I think my blog reflects my style. I love to take risks with my furniture. Almost every piece I paint, I experiment with a new technique. I love learning something new!
I'm still a newbie blogger so my blog is definitely still developing!

What am I working on?

Well at the moment I'm working on moving!!! We close escrow on our new house in just 3 days! So there is much to be done! I'm excited to start to share with you through the process of renovating our new home, since it is definitely a fixer upper!

We've only been inside it twice! So it's hard to make design decisions quite yet but I've got a good idea of what I'm thinking for paint colors! Some of the big projects, mainly the kitchens and bathrooms, will have to wait awhile. For now we will scrapping popcorn ceiling, installing new windows and flooring, and painting the whole house before we move in! Phew it makes me tired just thinking about it but I know it will be worth it!

Why do I write what I do?

I do not by any means consider myself a writer, if you read my blog I appolozie in advance for the many grammatical errors and run-on sentences! But I've enjoyed being able to share what I love with you, weather I'm painting furniture, crafting, or decorating my home! Here's a little background as to why I started blog in the first place...

A few years ago I went through a season in my life of deep sadness and grief. My grandma, whom I was extremely close to, passed away; less than a year later my stepdad was killed in a car accident. Painting furniture became therapy to me during this time. I'm not the kind of girl who can easily share her feelings with others. But painting kept me busy and creative and thinking about something else besides my sadness. I learned a lot about life, and although I will never be the same, I'm beginning to heal from the heartache of loss.


The blog is also a way for me to document what I've done and share and be inspired by others! It is my dream to turn this all in to a business some day! I love being a stay at home mom I feel blessed every day to be home with my kiddos and watch them learn and grow but I would also love to feel as though this hobby of mine could contribute to the family income! For now I'm making enough money painting furniture to feed my habit of yard sailing and such and also buy paint supplies, so that's a start!


Thank you for joining me on this little adventure! I'm excited to learn and dream with you!

Monday, September 29, 2014

Geometric Nightstands and Some Exciting News!

I'm excited to share with you these nightstands I just finished!

This is not my typical style, mid century modern and more clean lines. It was fun to do something a bit different. But also challenging!


I'm not a fan of measuring, taping, or being precise for that matter. And this project required all three of these things! They are not perfect but not bad for my first time doing this kind of furniture makeover. I think they would look awesome in a little boys room, on either side of a bed, holding Legos and such!


Another cool thing about these nights stands is the drawers are interchangeable since they're all the same size! So you can change up the pattern any time you like! When I painted them I used four different shades and I tried to randomly chose colors for each triangle so there's no set pattern.

Here the drawers are rearranged different then in my first shot.

I wanted to share a little more exciting news! Tomorrow we head to the east coast for my sister's wedding (I'm so excited to see family and friends and experience the beautiful fall colors!) and when we get back we close escrow on our new house!

I was going to wait to share with you until we closed escrow, but I just couldn't wait to share! It's a fixer upper so I will be posting pictures of our progress often! I would love for you to follow along on this new exciting journey with me! And I will be asking for your advice and help along the way!

Don't forget to sign up for an email subscription to my blog, Follow me on Bloglovin! Or "like" my Facebook Page so we can stay connected through this new adventure!

Linked up to:http://missmustardseed.com/http://elizabethandco.blogspot.com/http://www.lizmarieblog.comhttp://www.stonegableblog.comhttp://cityfarmhouse.com/http://www.thegoldensycamore.com,http://www.findingsilverpennies.com/, http://www.thegirlcreative.com/


Friday, September 26, 2014

Wall Art Tutorial (DIY for under $6!)

I'm excited to share a tutorial today on how I made my wall art in my entry way!

I love this project because it easy, quick, inexpensive, and it makes a big impact in my home! I love large pieces of wall art! It has become a problem though, I'm running out of wall space! I also love this project because you can personalize it for your family!
I choose to do my wedding anniversary (April 21st) for my numbers in my wall art, but the possibilities are endless! Today I will show you what I made for a friend's wedding!
I love how their initials turned out! And I love the fact that they used these on their wedding day and now they can hang them in their home!
I started with a large piece of plywood I got at Home Depot for a little under $6!
I measured and cut the piece into four smaller pieces (2ft x 1ft. each)
I stained the boards (this is an optional step, I chose to do it since I like a bit of the wood to show through and I'm not fond of the color the plywood sheets come in. I used some stain I already had on hand it's a custom mix of a grey stain and dark walnut. But any stain you have will work, since you don't see much of the stain any way.
Using paint I had in my stash, I did a white wash technique only with black paint. This particular black paint I used is Annie Sloan Grahite that I mixed with some Annie Sloan Old White, I mixed it forever ago so I'm not sure of the ratios but I love using it because softens the black into almost a dark charcoal color. It makes it look like it has faded over time which is a look I love!
For my "black wash" I added equal parts water to paint and brushed it on my pieces of plywood in quick long strokes. I wiped away the paint after brushing it with a rag. I wasn't worried about getting good coverage because I wanted it to look like the paint has worn away over time. I purposefully let some of the stain show through. Here's how it looked after one coat:

And here's after two coats:
The next step is adding the numbers or in this case letters for your art! This is the fun part and really you could do so many different things! You could use the numbers in your address, your wedding anniversary, your child's birthday (I love this idea for art in a nursery), spell a word since you have enough from one sheet of plywood to make four pieces you could spell a 4 letter word or a 3 letter word (Ex; FALL, LOVE, JOY, etc.) Some many possibilities!
For the ones I'm showing you today I used my friends initials her name is Michelle so I used an "M" and her fiancé's name starts with a J so I did an M & J.
I used my Silhouette Cameo to cut letters out of card stock and then I used the card stock as a stencil. For the &; I traced the symbol since that was easier than using the negative space from the card stock. Then I used Annie Sloan Old White (since I had it on hand) and a small angled watercolor brush to paint the letters by hand.
Finally I sanded down the signs a bit using my orbital sander and fine grit sandpaper (120) to rough them up a bit and soften the edges of the letters.
All in all it took me about 30 minutes to do and I love how they turned out! The signs are also pretty lightweight which makes them easy to hang (I just used some command strips)!
I hope you enjoyed my tutorial! I would love to hear if you have any other ideas for how you could personalize these signs!

My sweet blogging friend Sharon from Elizabeth&Co has invited my to join the Tour Through Blog Land! Check out her post here. I can't wait to share with you a bit more about myself, why I started my blog and some more exciting news!

Linked up to:http://missmustardseed.com/http://elizabethandco.blogspot.com/http://www.lizmarieblog.comhttp://www.stonegableblog.comhttp://cityfarmhouse.com/http://www.thegoldensycamore.com,http://www.findingsilverpennies.com/, http://www.thegirlcreative.com/

Tuesday, September 16, 2014

Taking a Risk (Frozen Inspired Cabinet)

If you know me at all you know I am not a risk taker, I hate roller coaster and flying in airplanes. Pretty much anything in my mind that involves any inherited risk, just does not sound like a good time to me.
The one area I feel like I can take risks in is in my painting, I think that's why I enjoy it so much! What's the worst thing that can happen?! If it doesn't turn out like I expected or hoped I can just sand it and start over!
I took a risk with this cabinet! What do you think?!


I've always adored hand painted furniture, especially scandinavian style. This is my first attempt at it! I was inspired by the door in the disney movie Frozen, you know the one Anna knocks on when she's trying to get Elsa to come play. I couldn't help but sing the song, "Do you Wanna Build a Snowman", while I was painting this piece (I know I'm a dork)!


I really like how the cabinet turned out! I know this style isn't for everyone but I love the beautiful chippyness of the paint along with the hand painted design on the cabinet doors.

I love the sides as well so chippy and lovely!


I used Miss Mustard Seed Milk Paint on this cabinet, a custom mix of Linen, Shutter Grey, and Luckett's Green, for the main portion of the piece. For the top drawer I just used Linen. For the detailing on the door I used Annie Sloan Chalk Paint in Old White and then I outlined it using a gold colored paint pen I got at Home Depot, its made by Sharpie.

Don't forget to "like" my Facebook page a Giveaway will be happening soon! Trust me you don't want to miss out!
Linked up to:http://missmustardseed.com/, http://elizabethandco.blogspot.com/, http://www.lizmarieblog.com, http://www.stonegableblog.com, http://cityfarmhouse.com/, http://www.thegoldensycamore.com, http://www.findingsilverpennies.com/, http://www.thegirlcreative.com/


Tuesday, September 2, 2014

Creating a Coastal Cottage Accent Table

If you've been following my blog for awhile you may have noticed I've been doing a lot of custom pieces for clients lately! It has been awesome! But with the start of the school year my custom jobs have slowed down. So I got to do one of my favorite things the other day...

Paint a little table however I want! It was amazing creative therapy for me and it reminded me of why I really love painting furniture. I experimented and just let the process flow and this is the outcome!


A friend asked me once why I don't just paint pieces in white, they would sell easier that way. She's probably right and I like a sweet white painted piece of furniture just as much as the next girl. But what's the fun in that?!


I chose to paint this piece with Miss Mustard Seed Milk Paint Shutter Grey, it's a light gray color with blue undertones.

Almost immediately after painting the first coat, before it even dried completely, I dry brushed a coat of white on top. In some places my dry brush strokes actually took off the first coat of Shutter grey and the wood peaked through. This is what it looked like after I added the dry brushing...
I'm loving the amazing texture and chippiness of this piece!

Next I added dark wax to my crazy color concoction! And I took a step back to look at my work. While I really liked it, it was just a bit too crazy. So I added a thin coat of shutter grey on top of the dark wax, ahhhh much better!

I'm so in love with this color! I wish I could keep this piece, but sadly I have no space for it. If you interested in purchasing it I list the pieces I'm selling on my Facebook page so stop by and "like" the Painted Willows on Facebook!

This project was exactly what I needed to get my creative juices flowing! Are you working on any creative projects?!

Linked up to:http://missmustardseed.com/http://elizabethandco.blogspot.com/http://www.lizmarieblog.comhttp://www.stonegableblog.comhttp://cityfarmhouse.com/http://www.thegoldensycamore.com http://www.findingsilverpennies.com/, http://www.thegirlcreative.com/